[머신러닝] 선형 회귀
선형 회귀
선형 회귀(Linear Regression)
아래 마인드 맵에 나와있는 것 처럼 선형 회귀는 지도 학습의 대표적인 회귀 알고리즘이다.
(Machine Learning -> Unsupervised Learning -> Linear Regression)
선형 회귀는 특성과 타깃 사이의 관계를 가장 잘 나타내는 선형 방정식을 찾는다.
특성이 하나인 경우 어떤 직선을 학습하는 알고리즘이다.
K-최근접 이웃 회귀의 문제점
선형 회귀에 대해 알아보기 전에 K-최근접 이웃 회귀의 문제점을 알아보자. 아래 예제를 복붙해서 한번 실행해 보길 바란다.
import numpy as np

height = np.array([10.0,11.0,12.0,13.0,14.0,15.0,16.0,17.0,18.0,19.0,
                   20.5,21.0,22.0,23.0,24.0,25.0,26.0,27.5,28.0,29.0,
                   30.0,31.0,32.0,33.0,34.0,35.0,36.0,37.0,37.5,38.0,
                   39.0,40.0,41.0,42.0,43.0,44.0,45.0,46.0,47.0,48.0,
                   49.0,50.0,51.3,52.0,53.0,54.0,55.0,56.0,57.0,58.0
                    ])

weight = np.array([100.0,101.9,102.0,103.0,104.0,105.0,106.0,107.0,108.0,109.0,
                   110.0,110.0,111.0,120.0,121.0,122.0,124.0,126.0,127.0,128.0,
                   130.0,135.0,137.0,138.0,140.0,150.0,151.0,155.0,160.0,162.0,
                   170.0,180.0,190.0,200.0,300.0,400.0,500.0,600.0,700.0,800.0,
                   850.0,850.0,860.5,870.7,880.0,890.0,900.0,920.0,930.0,950.0
                    ])


#훈련세트,테스트 세트 나누기. random_stata를 42로 하면 프로그램을 껐다켜도 훈련세트와 테스트 세트의 샘플이 유지된다.
from sklearn.model_selection import train_test_split
train_input, test_input, train_target, test_target = train_test_split(
    height, weight, random_state=42)

# 2차원으로 바꾸기
train_input = train_input.reshape(-1,1)
test_input = test_input.reshape(-1,1)

#모델 훈련 시키기
from sklearn.neighbors import KNeighborsRegressor

knr = KNeighborsRegressor()
knr.fit(train_input, train_target)

#훈련 시키기
knr.fit(train_input, train_target)

#60 height 예측하고 출력하기
print(knr.predict([[70]]))
결과 : [904.14]
결과가 이상하지 않은가? height 특성에서 가장 높은 58.0 보다 더 높은 70을 예측했는데 예측 결과가 904.14로 weight 특성 중 가장 높은 950.0 보다 더 작게 나온다.
훈련세트와 예측 샘플을 산점도로 나타내는 예제를 실행 시켜 보자.
import matplotlib.pyplot as plt #그래프 그리는 패키지 import

plt.scatter(train_input, train_target, color='red')

#60, 904.14 예측 데이터 그리기
plt.scatter([70], [904.14], color='green', marker='*')

plt.xlabel('height')
plt.ylabel('weight')
plt.show()
산점도를 보니 확실히 예측 샘플이 height는 높은데 weight 상대적으로 낮다는 것을 확인 할 수 있다.
이유는 간단하다. K-최근접 이웃 뿐 아니라 K-최근접 이웃 회귀 알고리즘도 주변의 K개의 샘플들의 weight를 평균하기 때문에 예측 데이터의 weight가 낮게 나오는 거다. 그렇다면 아무리 height가 높더라도 weight는 더 이상 오를 수가 없다.
데이터 준비하기
회귀 알고리즘을 사용하기 전 데이터를 준비하자. K-최근접 이웃 알고리즘의 데이터와 동일하다.
import numpy as np

height = np.array([10.0,11.0,12.0,13.0,14.0,15.0,16.0,17.0,18.0,19.0,
                   20.5,21.0,22.0,23.0,24.0,25.0,26.0,27.5,28.0,29.0,
                   30.0,31.0,32.0,33.0,34.0,35.0,36.0,37.0,37.5,38.0,
                   39.0,40.0,41.0,42.0,43.0,44.0,45.0,46.0,47.0,48.0,
                   49.0,50.0,51.3,52.0,53.0,54.0,55.0,56.0,57.0,58.0
                    ])

weight = np.array([100.0,101.9,102.0,103.0,104.0,105.0,106.0,107.0,108.0,109.0,
                   110.0,110.0,111.0,120.0,121.0,122.0,124.0,126.0,127.0,128.0,
                   130.0,135.0,137.0,138.0,140.0,150.0,151.0,155.0,160.0,162.0,
                   170.0,180.0,190.0,200.0,300.0,400.0,500.0,600.0,700.0,800.0,
                   850.0,850.0,860.5,870.7,880.0,890.0,900.0,920.0,930.0,950.0
                    ])


#훈련세트,테스트 세트 나누기. random_stata를 42로 하면 프로그램을 껐다켜도 훈련세트와 테스트 세트의 샘플이 유지된다.
from sklearn.model_selection import train_test_split
train_input, test_input, train_target, test_target = train_test_split(
    height, weight, random_state=42)

# 2차원으로 바꾸기
train_input = train_input.reshape(-1,1)
test_input = test_input.reshape(-1,1)
훈련 시키기
훈련 시켜보자.
이때 LinearRegression 클래스를 import 해준다.
#모델 훈련 시키기
from sklearn.linear_model import LinearRegression

lr = LinearRegression()

#선형 회귀 모델 훈련
lr.fit(train_input, train_target)

#예측하고 출력하기
print(lr.predict([[60]]))
결과 : [1008.57662241]
오, 결과를 보니 확실히 weight 예측 값이 이전보다 높아졌다.
산점도 그리기
수치도 봤으니 산점도로 확인 해보자.
import matplotlib.pyplot as plt #그래프 그리는 패키지 import

plt.scatter(train_input, train_target, color='red')

#예측 데이터 그리기
plt.scatter([70], [1008.57662241], color='green', marker='*')

plt.xlabel('height')
plt.ylabel('weight')
plt.show()
선형 회귀가 학습한 직선
선형 회귀는 특성이 하나인 경우 어떤 직선을 학습하는 알고리즘이라고 했다. 예제 에서는 height 특성 하나만 보고 직선을 학습 했다. 그렇다면 어떻게 직선을 학습 한 걸까?
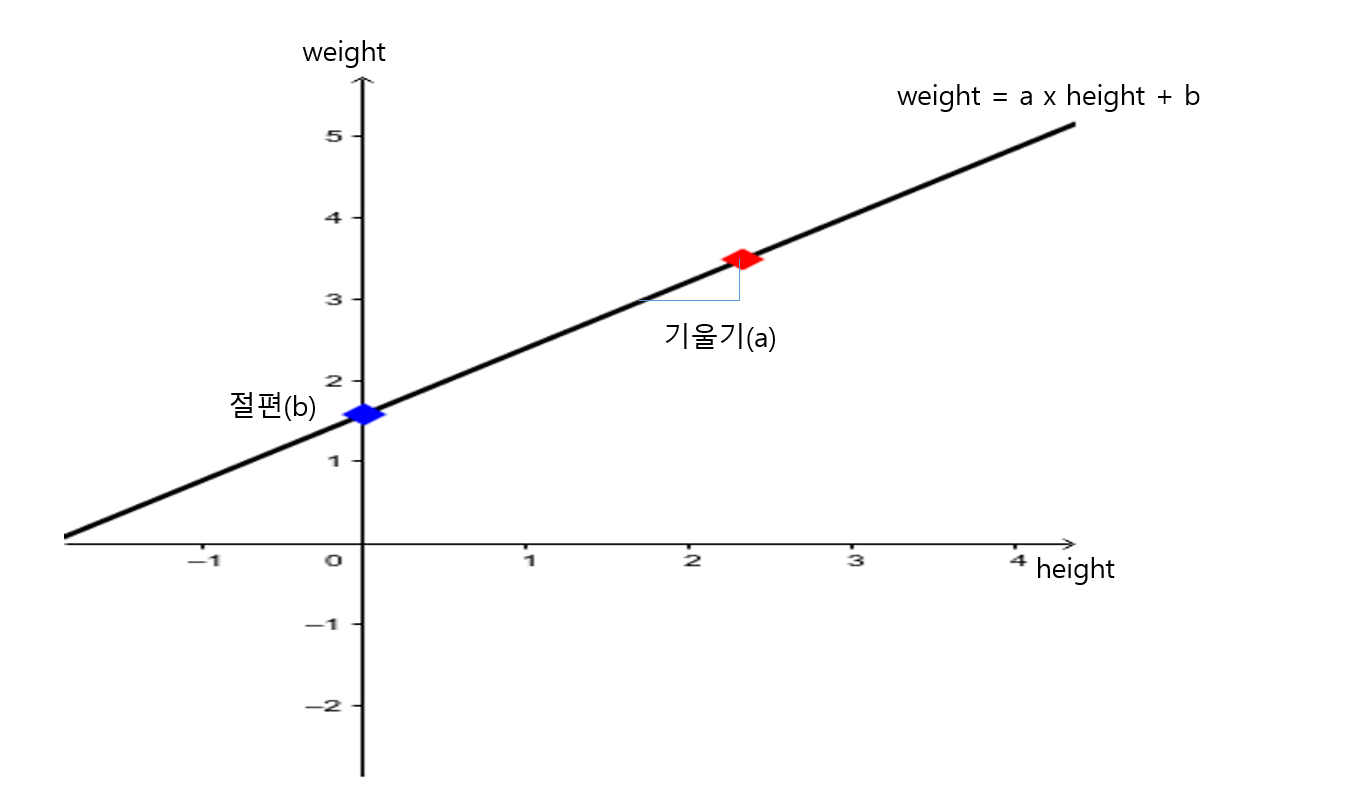
직선의 방정식
y = ax + b 우리가 옛날에 배웠던 직선의 방정식이다.
y = weight
x = height 라고 했을 때
weight = a x height + b 가 된다.
이제 직선을 그리려면 기울기(a)와 절편(b)가 필요하다.
여기서 LinearRegression 클래스가 가장 잘맞는 기울기(a), 절편(b)를 찾아 준다. a,b 값은 coef_ 와 intercept_ 속성에 저장되어 있다.
직선 그려보기
height 10 부터 70 까지 직선을 그려보자. 아까 말한 coef_, intercept 각각 기울기, 절편을 사용하여 두 점을 이어주면 된다.
import matplotlib.pyplot as plt #그래프 그리는 패키지 import

plt.scatter(train_input, train_target, color='red')

#예측 데이터 그리기
plt.scatter([70], [1008.57662241], color='green', marker='*')

#직선 그리기
plt.plot([10, 70], [10*lr.coef_+lr.intercept_, 70*lr.coef_+lr.intercept_])

plt.xlabel('height')
plt.ylabel('weight')
plt.show()
그래프에 나와있는 직선이 선형 회귀 알고리즘이 데이터셋에서 찾은 최적의 직선이다.
선형 회귀 알고리즘을 사용하면 훈련세트에 벗어난 새로운 데이터도 충분히 예측이 가능해 진다.
전체 소스코드
import numpy as np

height = np.array([10.0,11.0,12.0,13.0,14.0,15.0,16.0,17.0,18.0,19.0,
                   20.5,21.0,22.0,23.0,24.0,25.0,26.0,27.5,28.0,29.0,
                   30.0,31.0,32.0,33.0,34.0,35.0,36.0,37.0,37.5,38.0,
                   39.0,40.0,41.0,42.0,43.0,44.0,45.0,46.0,47.0,48.0,
                   49.0,50.0,51.3,52.0,53.0,54.0,55.0,56.0,57.0,58.0
                    ])

weight = np.array([100.0,101.9,102.0,103.0,104.0,105.0,106.0,107.0,108.0,109.0,
                   110.0,110.0,111.0,120.0,121.0,122.0,124.0,126.0,127.0,128.0,
                   130.0,135.0,137.0,138.0,140.0,150.0,151.0,155.0,160.0,162.0,
                   170.0,180.0,190.0,200.0,300.0,400.0,500.0,600.0,700.0,800.0,
                   850.0,850.0,860.5,870.7,880.0,890.0,900.0,920.0,930.0,950.0
                    ])


#훈련세트,테스트 세트 나누기. random_stata를 42로 하면 프로그램을 껐다켜도 훈련세트와 테스트 세트의 샘플이 유지된다.
from sklearn.model_selection import train_test_split
train_input, test_input, train_target, test_target = train_test_split(
    height, weight, random_state=42)

# 2차원으로 바꾸기
train_input = train_input.reshape(-1,1)
test_input = test_input.reshape(-1,1)

#모델 훈련 시키기
from sklearn.linear_model import LinearRegression

lr = LinearRegression()

#선형 회귀 모델 훈련
lr.fit(train_input, train_target)

# 예측하고 출력하기
print(lr.predict([[70]]))

import matplotlib.pyplot as plt #그래프 그리는 패키지 import

plt.scatter(train_input, train_target, color='red')

#예측 데이터 그리기
plt.scatter([70], [1008.57662241], color='green', marker='*')

#직선 그리기
plt.plot([10, 70], [10*lr.coef_+lr.intercept_, 70*lr.coef_+lr.intercept_])

plt.xlabel('height')
plt.ylabel('weight')
plt.show()
참조
혼자 공부하는 머신러닝 + 딥러닝(박해선, 한빛 미디어) : https://hongong.hanbit.co.kr/%ED%98%BC%EC%9E%90-%EA%B3%B5%EB%B6%80%ED%95%98%EB%8A%94-%EB%A8%B8%EC%8B%A0%EB%9F%AC%EB%8B%9D-%EB%94%A5%EB%9F%AC%EB%8B%9D/
혼자 공부하는 머신러닝 + 딥러닝(깃 허브) : https://github.com/rickiepark/hg-mldl


댓글
댓글 쓰기